


Super X Rifle Owner's Manual
Super X Rifle Owner's Manual

Winchester is a registered trademark of Olin Corporation.
Important instructions for: Winchester Super X Rifle.
If you have any questions or comments regarding your new firearm, please feel free to write or call us.
Winchester Repeating Arms
Customer Service Department (United States)
275 Winchester Avenue
Morgan, Utah 84050-9333
Phone: (800)-945-5237
Please use the space below to record information about your new firearm.
Model __________________________________________________
Serial Number ____________________________________________
Purchased From __________________________________________
Date of Purchase __________________________________________
Specifications within this owner’s manual are correct at the time of printing and subject to change without notice.
WARNING: YOU ARE RESPONSIBLE FOR FIREARMS SAFETY
WARNING: YOU ARE RESPONSIBLE FOR FIREARMS SAFETY

IT IS ESSENTIAL THAT THESE OPERATING INSTRUCTIONS BE THOROUGHLY STUDIED BEFORE USING THIS FIREARM TO ASSURE PROPER AND SAFE GUN HANDLING. FAILURE TO FOLLOW THESE INSTRUCTIONS OR FAILURE TO OBEY ANY SAFETY WARNING MAY RESULT IN INJURY TO YOURSELF OR OTHERS, OR CAUSE DAMAGE TO YOUR FIREARM.
As a gun owner, you accept a set of demanding responsibilities. How seriously you take these responsibilities can be the difference between life and death. There is no excuse for careless or abusive handling of any firearm. At all times handle your rifle and any other firearm with intense respect for its power and potential danger.
PLEASE READ AND UNDERSTAND ALL OF THE CAUTIONS, PROPER HANDLING PROCEDURES AND INSTRUCTIONS OUTLINED IN THIS OWNER’S MANUAL BEFORE USING YOUR NEW FIREARM.
1 - Do not carry a loaded firearm with a live cartridge in the chamber while running, climbing a tree, crossing a fence or anywhere you might slip or fall, drop the firearm or otherwise bump or jar the firearm. A firearm that is dropped, bumped or jarred with a chambered cartridge might accidentally discharge even with the safety on, causing serious injury to you or someone else. When you are ready to shoot and a cartridge is chambered, keep the safety in the “on safe” position until shooting is imminent.
2 - Do not rely on the safety to prevent accidental discharge. Many safeties merely block the trigger and prevent firing by pulling the trigger. The safety may not prevent an accidental discharge due to dropping, jarring or bumping a firearm.
3 - Use only ammunition for which the firearm is chambered, as indicated on the barrel, to prevent excessive pressure and possible serious personal injury.
4 - Incorrectly reloaded ammunition can cause serious personal injury and damage to the firearm due to excessive pressure. Reload only after proper instruction and in strict compliance with instruction and data contained in current reloading manuals.
5 - Never point a firearm at anything you do not intend to shoot. Always keep the muzzle pointed in a safe direction in case of accidental discharge
6 - Always check to ensure that the barrel is free of obstructions before loading and using the firearm. If you experience light recoil or an off sound, keep the muzzle pointed in a safe direction and check the barrel for an obstruction.
7 - Before firing, clean any grease or oil out of the chamber and the barrel with a cleaning rod and patch. Grease or heavy accumulation of oil can cause excessive pressures and result in serious personal injury.
8 - Keep the barrel, chamber and action free of rust. Rust in the barrel and chamber can cause excessive pressures resulting in serious injury. A rusted, pitted or eroded barrel should be replaced.
9 - Use hearing protection to prevent ear damage from repeated exposure to gunfire.
10 - Always use proper shooting glasses to prevent eye injury from flying particles.
11 - Never carry a loaded firearm in a motor vehicle or into a dwelling. Always carefully unload the firearm before entering a motor vehicle, a dwelling or an area such as a camp. Always point firearms in a safe direction while loading or unloading to prevent serious injury in case of an accidental discharge. Never load your firearm in a house or in a vehicle.
12 - Never shoot at a hard, flat surface or at the surface of water, to avoid a ricochet and possible serious personal injury to yourself or a bystander.
13 - Store firearms in a clean, dry place out of reach of children and separated from stored ammunition.
14 - Never alter any parts of your firearm. Any alterations or adjustments that may become necessary to the operating mechanism should be performed by a qualified gunsmith.
15 - Hunting from elevated surfaces, such as tree stands, is dangerous. Doing so may increase the risk of handling any firearm. Always make certain that the stand being used is safe, sturdy and stable. Always make certain your firearm is unloaded when it is being taken up and down from the stand. Always make certain that your firearm is not dropped from the stand or dropped while it is being taken up or down from the stand.
16 - Discharging firearms in poorly ventilated areas, cleaning firearms or handling ammunition may result in exposure to lead and other substances known to cause birth defects, reproductive harm and other serious physical injury. Insure adequate ventilation at all times. Wash hands thoroughly after every exposure.
BE CAREFUL!
BE CAREFUL!
GENERAL DESCRIPTION
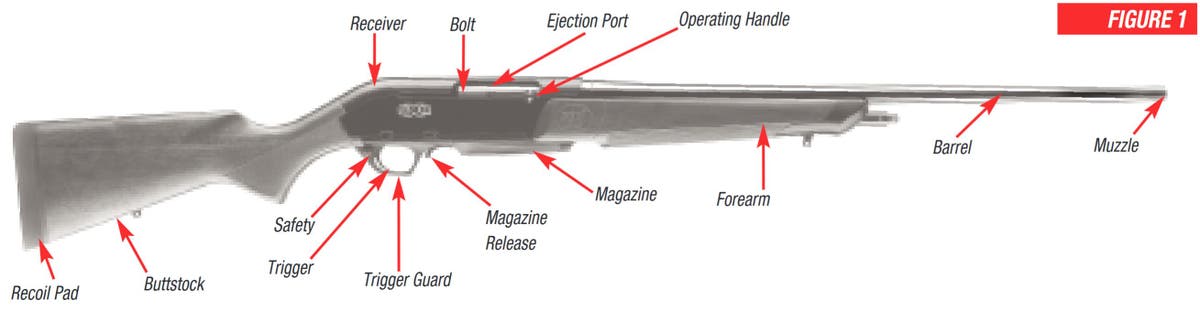
The Super X™ Rifle is an autoloader with styling and features that place it above the competition. The reliable gas-operated action reduces recoil for ultra-fast follow-up shots. The heavy-duty multiple lug bolt provides tight lock- up for a level of accuracy uncommon to autoloading rifles.
Refer to Figure 1 for general part descriptions regarding your new rifle. You must become familiar with all part names listed before proceeding with the rest of the instructions in this owner’s manual.
IMPORTANT: ALWAYS KEEP THE MUZZLE POINTED IN A SAFE DIRECTION. USE THE CORRECT AMMUNITION REFERENCED BY THE INSCRIPTION ON THE BARREL. BEFORE LOADING YOUR GUN BE SURE ALL GREASE AND OIL HAVE BEEN REMOVED FROM THE BARREL AND CHAMBER, AND THERE ARE NO OBSTRUCTIONS.
GENERAL OPERATION
This is a gas-operated, autoloading repeating rifle. With cartridges in the magazine and the chamber, and the safety in the “off safe” position, the rifle will fire a single cartridge with each successive pull of the trigger until the magazine and chamber are empty. With a magazine in place, when the last cartridge has been fired, the bolt will be held in its rearward, or open position. This facilitates speedy and convenient reloading.
Prior to using live ammunition, familiarize yourself thoroughly with these operating instructions. Get accustomed to the feel of your new gun and know the forces required to operate the action. Learn how to pull the trigger and, above all, know the location and operation of the safety. Procedures for disassembly and operation of various components are outlined in the sections in this owner’s manual. Please read and study them thoroughly.
TERMINOLOGY AND DESCRIPTIONS
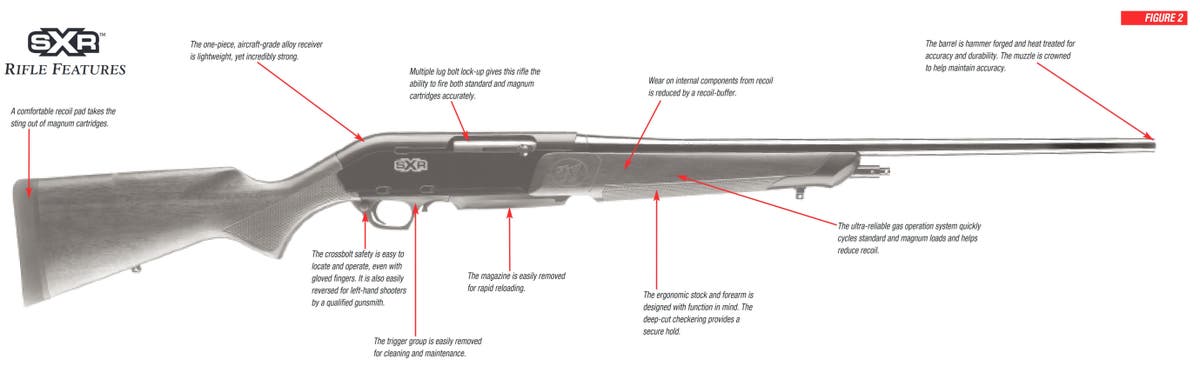
Descriptions in this owner's manual generally refer to the firearm in the horizontal position. That is, in the normal firing position. For example, the muzzle is forward or front; the buttstock is rearward or rear; the trigger is downward or underneath; the sights are upward or on top. For general parts terminology, refer to Figure 1. Figure 2 covers the general features and benefits of the rifle’s design.
Throughout this owner’s manual, the “action” refers to the mechanism of this rifle which loads and secures the cartridge in the chamber.
SERIAL NUMBER
The serial number is located on the left side of the receiver, just above the trigger guard. Record the serial number at the front of this owner’s manual for future reference.
WARNING: WEAR EYE PROTECTION WHEN ASSEMBLING AND DISASSEMBLING YOUR RIFLE TO PREVENT SPRINGS, SPRING-LOADED PARTS, SOLVENTS, OR OTHER AGENTS FROM CONTACTING YOUR EYES, RESULTING IN INJURY.
Initial Cleaning and Oiling
Initial Cleaning and Oiling
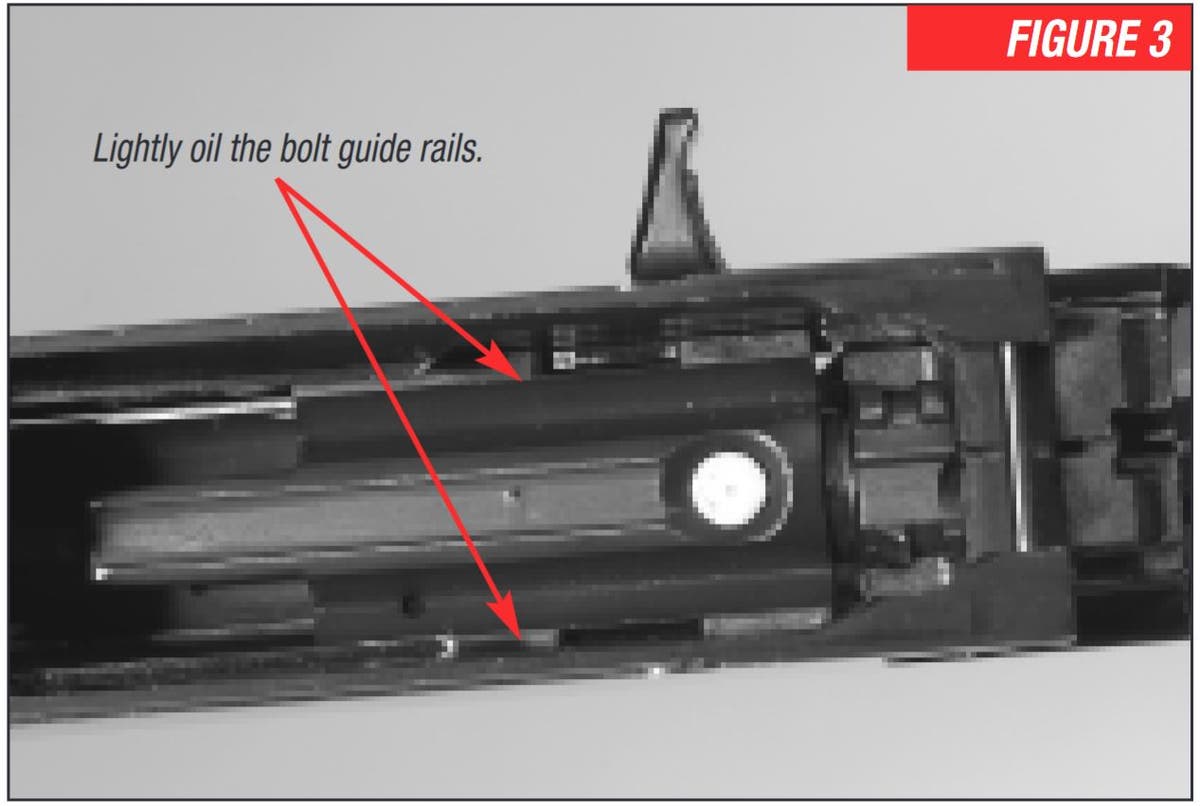
Some metal parts of your new rifle have been coated at the factory with a rust preventative compound. Before first using your rifle, a high-quality, light gun oil should be used to remove this compound and to give your new gun its first lubrication. Wipe the action and bolt clean, and apply a few drops of quality oil inside the receiver on the bolt guide rails located on both sides of the receiver (Figure3). Clean the barrel using a cleaning rod and patch as explained under “Cleaning and Maintenance Suggestions" in this owner’s manual.
If your new rifle is to be stored for an extended period of time, it is permissible to leave the rust preventative compound in place and keep your rifle in its box for maximum protection during long-term storage.
It is recommended that the “Cleaning and Maintenance Suggestions” be followed before each oiling.
PLEASE TAKE NOTE OF THE FOLLOWING INFORMATION BEFORE CLEANING YOUR RIFLE.
CLEANING PARTS WITH SPECIAL FINISHES
CLEANING PARTS WITH SPECIAL FINISHES
Be especially careful when cleaning guns with camouflage, Dura-Touch® Armor Coating and other special finishes. Always prevent these surfaces from coming in contact with cleaning solvents, barrel scrubbers and other strong chemicals. It is preferable to clean these surfaces with a light gun oil containing no solvents, or with a damp cloth and mild dish soap (be sure to keep water out of the action). When cleaning your firearm’s bore and action, protect the external finishes from any contact with chemicals used. Also, avoid any contact between external finishes and other strong chemicals like those found in DEET-containing insect repellents, sunscreens, etc. Damage to camouflage, Dura-Touch and other finishes caused by chemicals is irreversible and unrepairable.
Ammunition
Ammunition
This rifle must only be used with the caliber of ammunition as designated on the barrel. Always read the ammunition label and any enclosures with the ammunition to assure that the ammunition is appropriate or that there is no restriction for its use with your firearm. We can assume no responsibility for incidents which occur through the use of cartridges of nonstandard dimension or those developing pressures in excess of SAAMI (Sporting Arms and Ammunition Manufacturer’s Institute) established standards.
Winchester ammunition is always an excellent choice for your new Winchester rifle, delivering the unmatched performance and dependability you want.
DISCHARGING FIREARMS IN POORLY VENTILATED AREAS, CLEANING FIREARMS OR HANDLING AMMUNITION MAY RESULT IN EXPOSURE TO LEAD AND OTHER SUBSTANCES KNOWN TO CAUSE BIRTH DEFECTS, REPRODUCTIVE HARM AND OTHER SERIOUS PHYSICAL INJURY. ENSURE ADEQUATE VENTILATION AT ALL TIMES. WASH HANDS THOROUGHLY AFTER EVERY EXPOSURE.
Operation of the "Safety"
Operation of the "Safety"
IT IS ESSENTIAL THAT YOU BECOME FAMILIAR WITH THE FEEL, LOOK AND OPERATION OF THE SAFETY ON THIS RIFLE BEFORE ATTEMPTING TO LOAD AND SHOOT IT.
WARNING: THE SAFETY SHOULD BE KEPT IN ITS “ON SAFE” POSITION AT ALL TIMES EXCEPT WHEN SHOOTING IS IMMINENT.
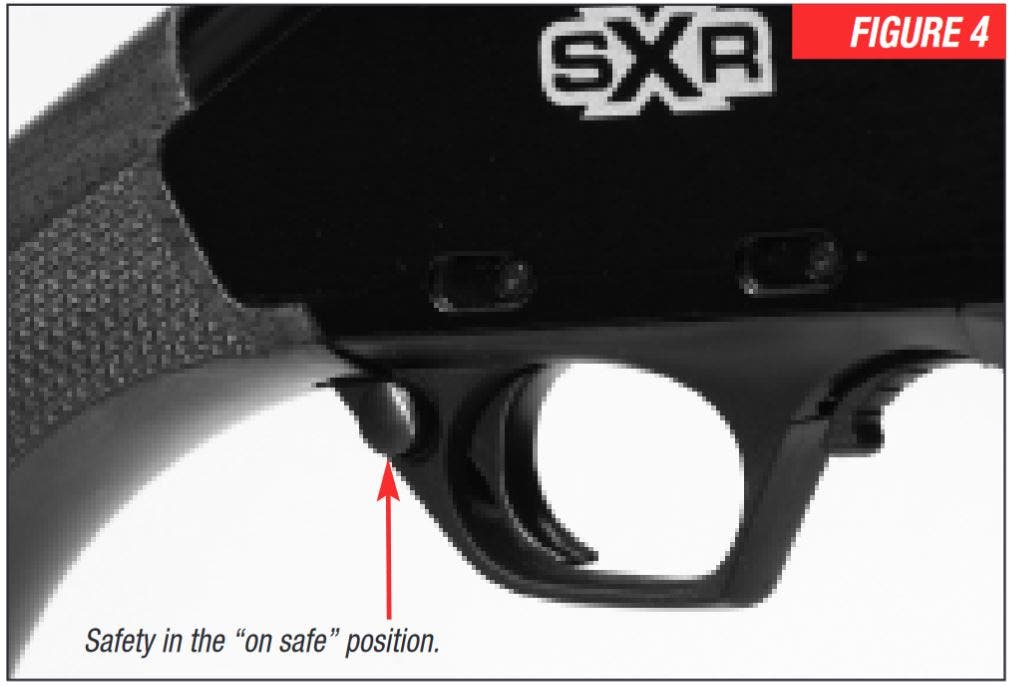
The trigger-block type safety is conveniently located on the trigger guard just to the rear of the trigger. This is an ideal location for manipulation of the safety button with the index finger of either hand.
- “On Safe” — With the safety pushed completely to the right, the rifle is in the “on safe” position, and rearward movement of the trigger is blocked (Figure 4). Always maintain the safety in this position when a cartridge is in the chamber and until shooting is imminent.
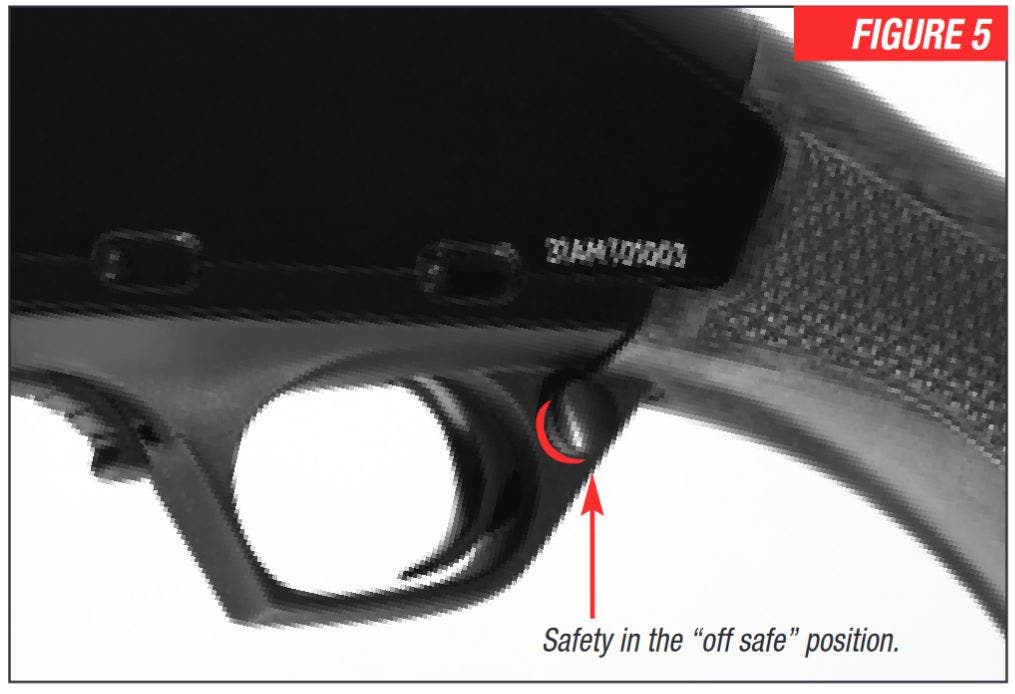
- “Off Safe” — With the safety pushed completely to the left, the rifle is “off safe” and ready to fire. In this “off safe” position a band of RED is visible on the safety where it projects beyond the left face of the trigger guard (Figure 5).
CAUTION: THE RED WARNING BAND ON THE SAFETY BUTTON IS FOR CONVENIENCE ONLY. DO NOT DEPEND ON THE RED COLOR ALONE TO INDICATE YOUR FIREARM’S SAFETY STATUS, AS TIME, EXPOSURE TO THE ELEMENTS, AND THE ABRASIVE ACTION OF CLEANING AGENTS CAN ERASE IT.
WARNING: IF YOUR RIFLE WAS PURCHASED USED, THE “SAFETY” MAY HAVE BEEN REVERSED FOR A LEFT-HANDED SHOOTER.
Please take time to inspect your rifle’s safety for the positioning mentioned above, and become familiar with its operation and safety button position in the “on safe” and “off safe” modes.
When engaged, the safety mechanism is designed to prevent firing. However, this mechanism will not necessarily prevent the accidental discharge of this firearm as a result of jarring or abuse such as occurs when a firearm is dropped.
Never rely totally on your firearm’s safety. It is merely an aid to safe gun handling. Like any mechanical device the safety can possibly fail; it can be bumped “off safe” or inadvertently manipulated into an unsafe condition. At all times, keep the safety in the “on safe” position and the muzzle pointed in a safe direction. It is advisable to never load your rifle until you are in the field, at the location you intend to begin hunting or you are at your bench on a range and it is clear to shoot. For extra safety on a range, and as a courtesy to others, fully unload the rifle and keep the action in the open position at all times other than when it is clear to shoot.
Operation of the Bolt
Operation of the Bolt
This rifle does not have an external bolt release. With a loaded magazine or the magazine removed, the bolt can easily be closed by pulling the operating handle fully to the rear to disengage the bolt lock. If the magazine is empty, the magazine must be removed to close the bolt.
To lock the bolt in the open position, an empty magazine must be in the rifle. The bolt will lock and remain open after the last cartridge from the magazine has been fired.
WARNING: KEEP YOUR FINGERS CLEAR OF THE EJECTION PORT AT ALL TIMES. The bolt closes with considerable force if you pull the operating handle to the rear and release it without a magazine in the magazine well, or when a loaded magazine has been placed in the magazine well.
Loading
Loading
This rifle utilizes a detachable box magazine. The capacity of the magazine is four cartridges (three cartridges for magnum and WSM calibers). Another cartridge may be carried in the chamber, providing a total rifle capacity of five cartridges (four cartridges for magnum and WSM calibers).
Loading the magazine is fast and easy. To facilitate reloading, additional loaded magazines can be carried in your pocket or pack. These can be purchased at your Winchester Rifles and Shotguns dealer.
LOADING THE CHAMBER FROM THE MAGAZINE
LOADING THE CHAMBER FROM THE MAGAZINE
1. BE SURE THE SAFETY IS IN THE “ON SAFE” POSITION AND THE MUZZLE IS POINTED IN A SAFE DIRECTION.
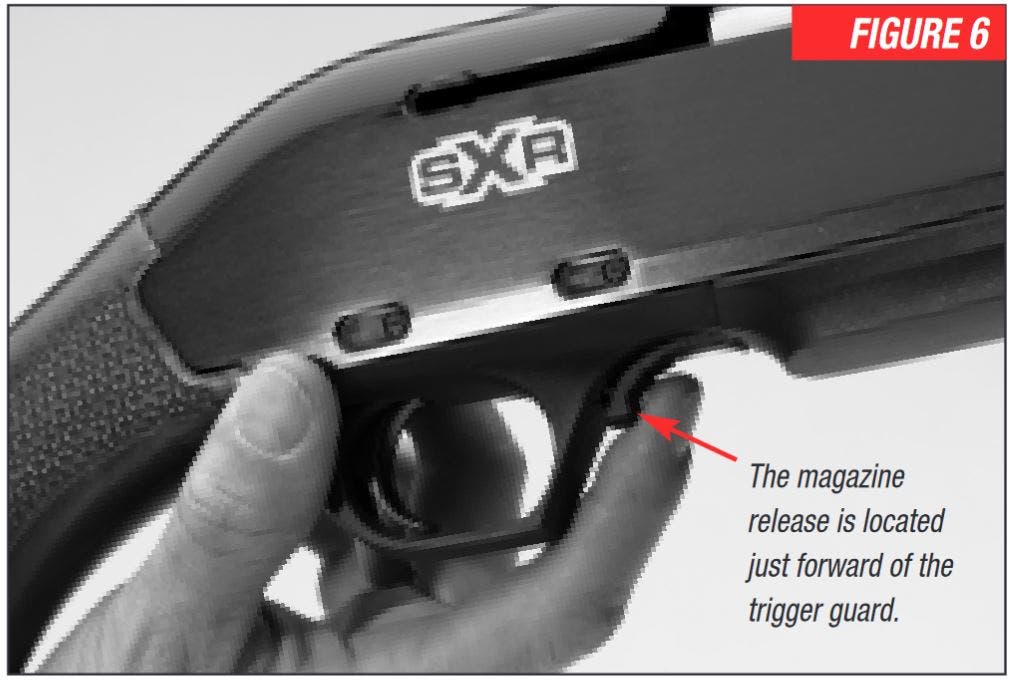
2. Remove the magazine by pressing the magazine release button located underneath the rifle, in front of the trigger guard, with the index finger of your free hand (Figure 6). The magazine will drop free into your hand.
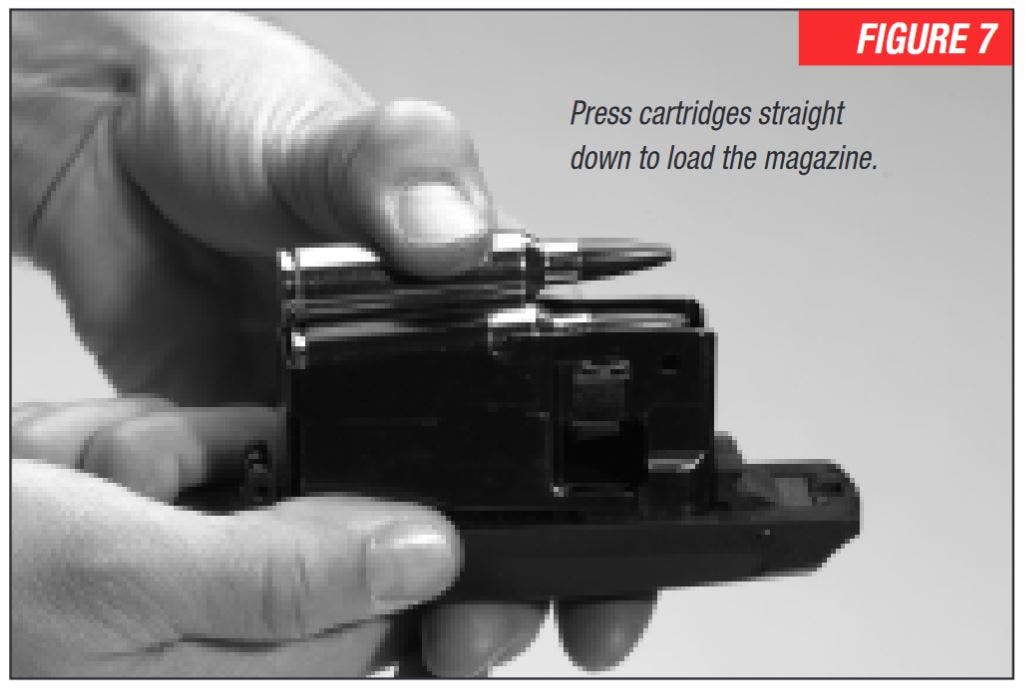
3. Each cartridge should then be carefully inserted into the magazine until it is retained by the metal lips (Figure 7).
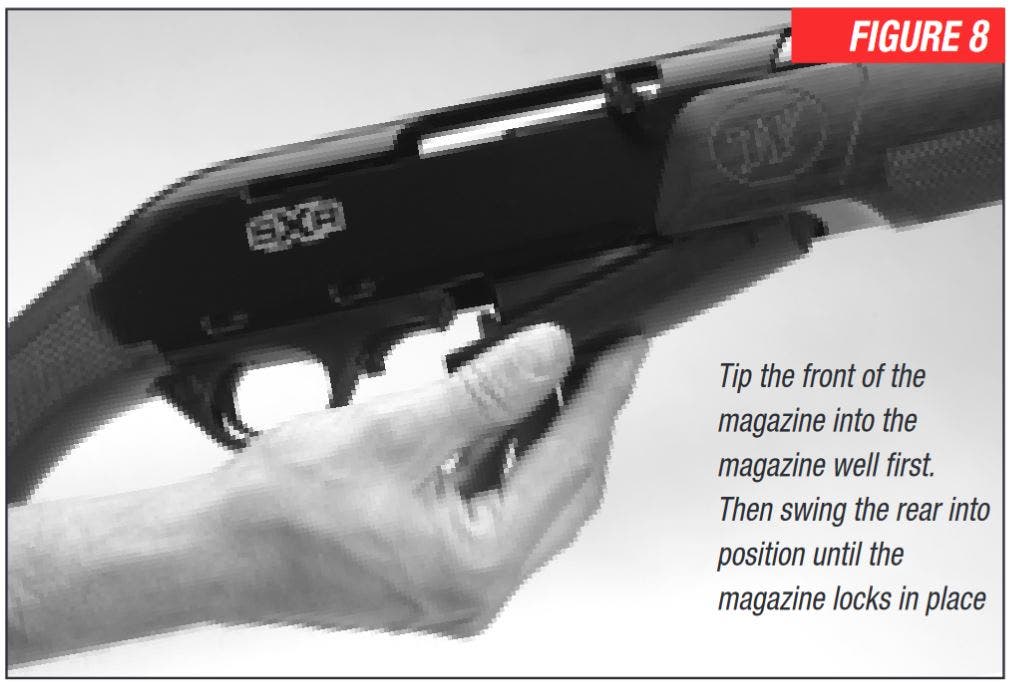
4. Insert the loaded magazine into the magazine well by tipping the front of the magazine into the front of the magazine well and swinging the rear of the magazine up until it locks in place (Figure 8).
5-Load the chamber by pulling the operating handle fully rearward and releasing it, allowing the bolt to slam closed from the open position. If the bolt is not allowed to close in this manner, there is a possibility that it will not close completely, preventing the rifle from firing.
6-Once a cartridge has been chambered, the magazine may be removed at any time desired for refilling to full capacity
LOADING A CARTRIDGE DIRECTLY TO THE CHAMBER
LOADING A CARTRIDGE DIRECTLY TO THE CHAMBER
1. BE SURE THE SAFETY IS IN THE “ON SAFE” POSITION AND THE MUZZLE IS POINTED IN A SAFE DIRECTION.
2. Hold the rifle on its side with the ejection port up and the muzzle pointed in a safe direction.
3. Insert an unloaded magazine into the rifle and lock the bolt open by pulling the operating handle to the rear.
4. Insert a single cartridge through the ejection port, and drop it into the chamber.
5. Remove the empty magazine. Close the bolt by pulling the operating handle fully rearward and releasing it. The bolt should be allowed to slam closed from its opened position. If the bolt is not allowed to close in this manner, there is the possibility that it will not close completely, in which event the rifle will not fire.
6. Once a cartridge has been chambered, a loaded magazine may be inserted into the rifle.
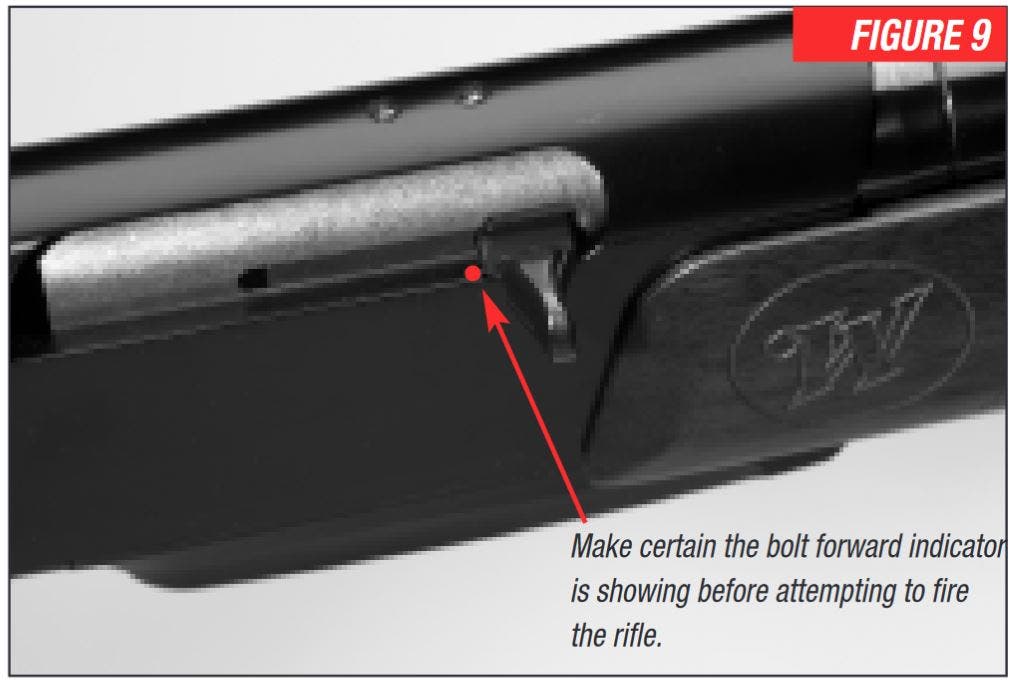
It is safer to hunt with an empty chamber until in the presence of game. In this situation, quietness in chambering a cartridge is sometimes of prime importance. To accomplish this, cycle the action slowly and quietly by pulling the operating handle to it’s full rearward position. Then, while keeping the operating handle controlled, ease it forward, making sure the bolt closes completely. To verify the bolt is closed completely, make sure the operating handle is in front of the red bolt forward indicator dot located on the receiver near the ejection port (Figure 9). You should first practice this technique with an empty chamber.
Firing
Firing
1. Insert a cartridge into the chamber (as explained previously) by loading a cartridge from the magazine or directly to the chamber.
2. With a cartridge in the chamber, you need only to move the safety to the “off safe” position to make the rifle ready for firing. Do not move the safety to the “off safe” position unless shooting is imminent.
3. Squeeze the trigger.
4. After a cartridge has fired, the bolt automatically moves rearward, ejects the empty case, then returns forward, loading a fresh cartridge from the magazine. Because fired cases are ejected to the right side, bystanders should not stand to the right of the shooter.
5. This operation is repeated each time you pull the trigger until the last cartridge from the magazine has been fired. If shooting is no longer imminent, immediately place the safety in the “on safe” position. See “Unloading” for more information.
6. After the last cartridge is fired, the bolt will lock in the rearward position. If you wish to continue shooting, you can remove and reload the magazine in either of the two ways described previously. After reloading the magazine, if shooting is imminent, you can chamber a cartridge and resume firing by pulling the operating handle fully rearward. If your rifle is to be put away and stored, do not reload the magazine. The chamber and magazine must remain empty when storing your rifle.
Unloading
Unloading
1. WITH THE MUZZLE POINTED IN A SAFE DIRECTION AND THE SAFETY IN THE “ON SAFE” POSITION, press the magazine release button to remove the magazine.
2. Pull rearward on the operating handle to draw the bolt to its rearmost, open position. This will extract and eject any live cartridge that may be in the chamber. PLEASE NOTE THAT THE BOLT WILL NOT AUTOMATICALLY LOCK IN THE REARWARD POSITION WHEN THE MAGAZINE IS REMOVED OR WHEN THE MAGAZINE IS LOADED. AS A GOOD SAFETY PRACTICE, HOLD THE BOLT OPEN AND VISUALLY INSPECT THE CHAMBER TO BE ABSOLUTELY SURE A LIVE CARTRIDGE IS NOT PRESENT.
3. With the magazine removed and the chamber empty, the bolt may be closed. The magazine can be kept loaded or unloaded and inserted back into the magazine well. Unload the magazine by sliding each cartridge forward and out of the magazine
In the Case of a Misfire
In the Case of a Misfire
Only rarely will modern factory ammunition experience a misfire. If this ever occurs when shooting your rifle, follow these instructions carefully.
CAUTION: IN CASE OF MISFIRE, KEEP THE MUZZLE POINTED IN A SAFE DIRECTION AND REMOVE THE MAGAZINE. CAREFULLY OPEN THE ACTION WHILE AVOIDING DIRECT EXPOSURE TO THE BREECH BY YOU AND OTHERS AND REMOVE THE CARTRIDGE FROM THE CHAMBER.
Carefully inspect the ejected cartridge. If the primer is indented, the cartridge should be disposed of in a manner that would prevent accidental injury to you or others. If there is no indentation in the primer, your gun has malfunctioned and should be serviced by a qualified gunsmith, or by a Winchester Rifles and Shotguns Authorized Repair Center (ARC).
Trigger Group
Trigger Group
The trigger mechanism has been adjusted at the factory to provide a short, crisp pull consistent with safety and reliability. The trigger is a single-stage design with the weight of pull holding closely to four pounds. It is recommended that no attempt be made to change the weight of pull of the trigger.
REMOVING THE TRIGGER GROUP
REMOVING THE TRIGGER GROUP
This procedure should rarely, if ever, need to be performed. However, if the receiver area of your rifle should become excessively dirty or submerged in water it may be helpful to remove the trigger group and expose the inner cavity of the receiver for cleaning.
DO NOT ALTER OR ATTEMPT TO DISASSEMBLE ANY PART OF THE TRIGGER GROUP OR REMOVE OR DISASSEMBLE THE BOLT MECHANISM.
If any service of the trigger group or bolt becomes necessary, send your rifle to the Winchester Rifles and Shotguns Service Center in Arnold, Missouri.
1. BE CERTAIN THE RIFLE IS COMPLETELY UNLOADED AND THE SAFETY IS IN THE “ON SAFE” POSITION. Again, to unload your rifle, remove the magazine and eject any live cartridge in the chamber by pulling the operating handle to the rear.
2. Release the bolt to its forward position.
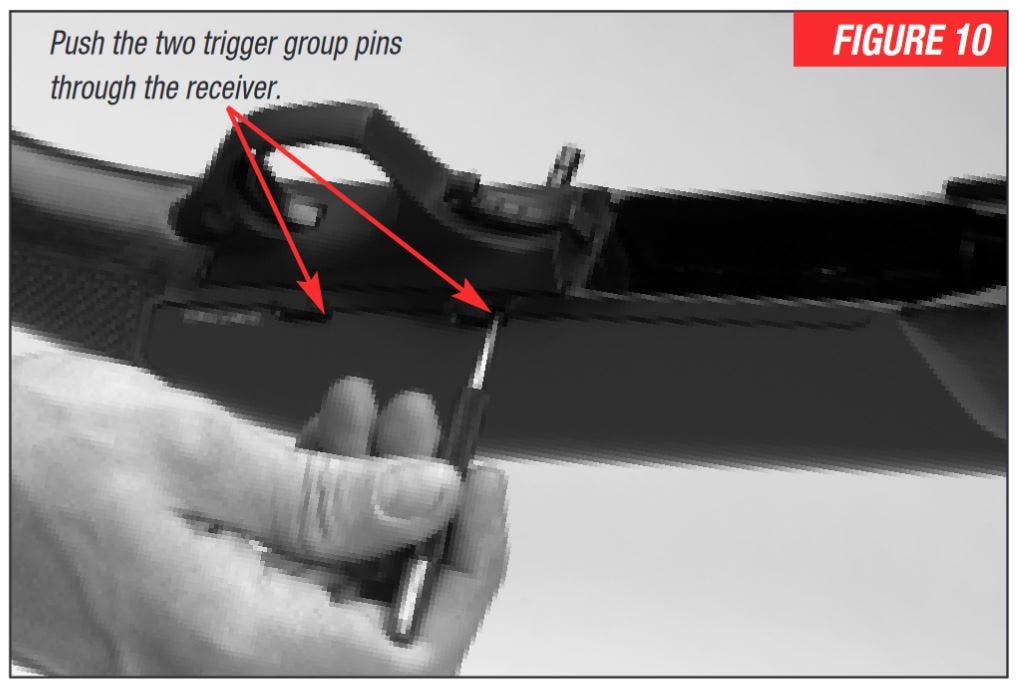
3. Push in the two trigger group pins from either the right or left side of the receiver. Use a drive punch or similar object, using care not to scratch the gun’s receiver (Figure 10). Push the trigger group pins clear through the receiver.
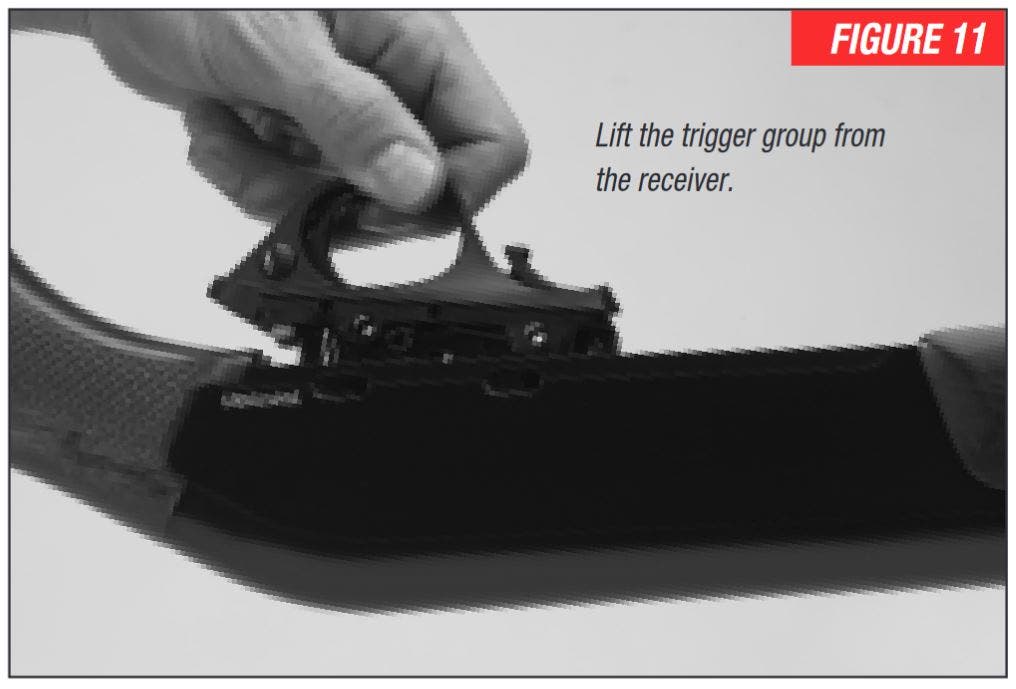
4. Grasp the trigger guard and pull the trigger group out of the receiver (Figure 11).
5. Perform any cleaning of the parts and receiver cavity as necessary. We suggest cleaning the trigger group with a quality aerosol gun solvent. Allow it to dry and then very lightly oil the moving parts.
DO NOT DISASSEMBLE THE TRIGGER GROUP BEYOND THIS POINT.
TRIGGER GROUP REINSTALLATION
TRIGGER GROUP REINSTALLATION
1. Before reinstalling the trigger group, make sure that the bolt is fully forward and engaged in the locked position.
2. Visually check the safety on the trigger guard to make certain it is still in the “on safe” position.
3. Insert the trigger group back into the receiver, lining up the holes in the trigger group with the holes on each side of the receiver.
4. Insert the trigger group pins from either side of the receiver and gently tap them into place using care not to scratch the receiver
Disassembly
Disassembly
NEVER ATTEMPT TO TAKE YOUR RIFLE APART FURTHER THAN EXPLAINED IN THIS OWNER’S MANUAL.
This rifle is a specialized, finely-fitted mechanism. You may permanently mar it or lose small parts by attempting to disassemble the inner mechanism assemblies. Be sure to use eye protection whenever disassembling and reassembling your rifle due to the presence of spring- tension parts. If further disassembly for service or cleaning is required, take your gun to a Winchester Rifles and Shotguns Authorized Repair Center or a qualified gunsmith, or send it to our Arnold, Missouri, service facility as explained under “Parts, Service, Repair and Questions”.

1. BE CERTAIN THE RIFLE IS COMPLETELY UNLOADED AND THE SAFETY IS IN THE “ON SAFE” POSITION. Again, to unload your rifle, remove the magazine and eject any live cartridge in the chamber by pulling the operating handle to the rear.
2. Release the bolt to its forward position.
3. Use a 9mm wrench (shown) or pass a small instrument, such as a screwdriver or punch, through the sling swivel stud eyelet on the forearm (Figure 12) to remove the sling swivel. Taking care not to scratch the forearm, turn the sling swivel in a counterclockwise direction.
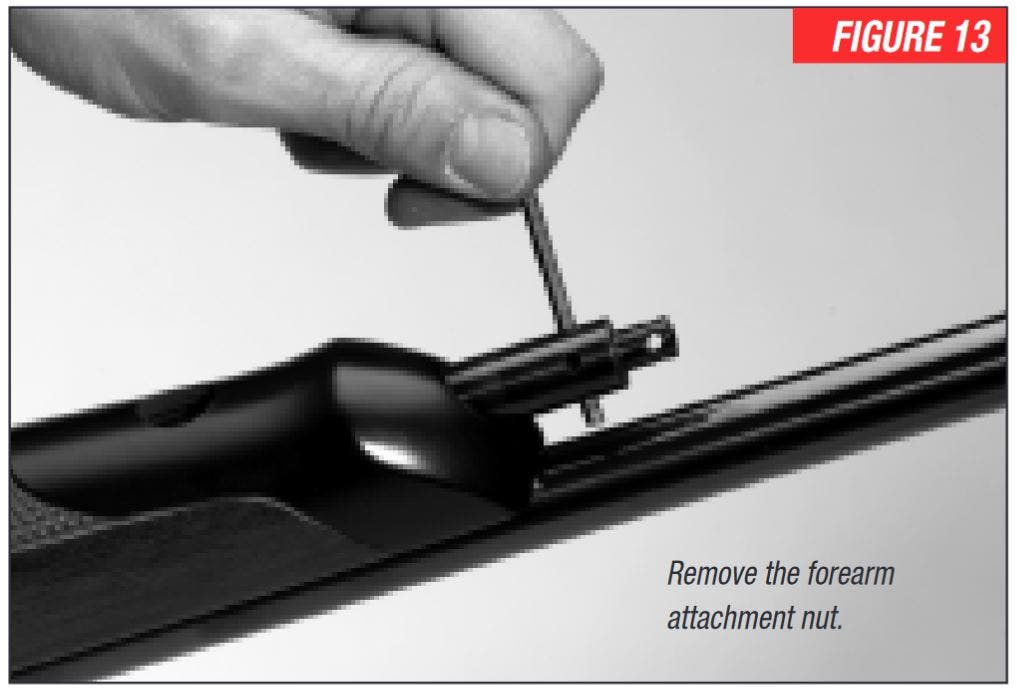
4. Pass a small instrument, such as a screwdriver or punch, through one of the holes in the forearm attachment nut (Figure 13), taking care not to scratch the forearm, turn the forearm attachment nut in a counterclockwise direction. The forearm attachment nut is captive and non-removable. Approximately 10 half-turns will loosen the nut so you can remove the forearm.
5. Firmly grasp the forearm and slide it forward and off the rifle.
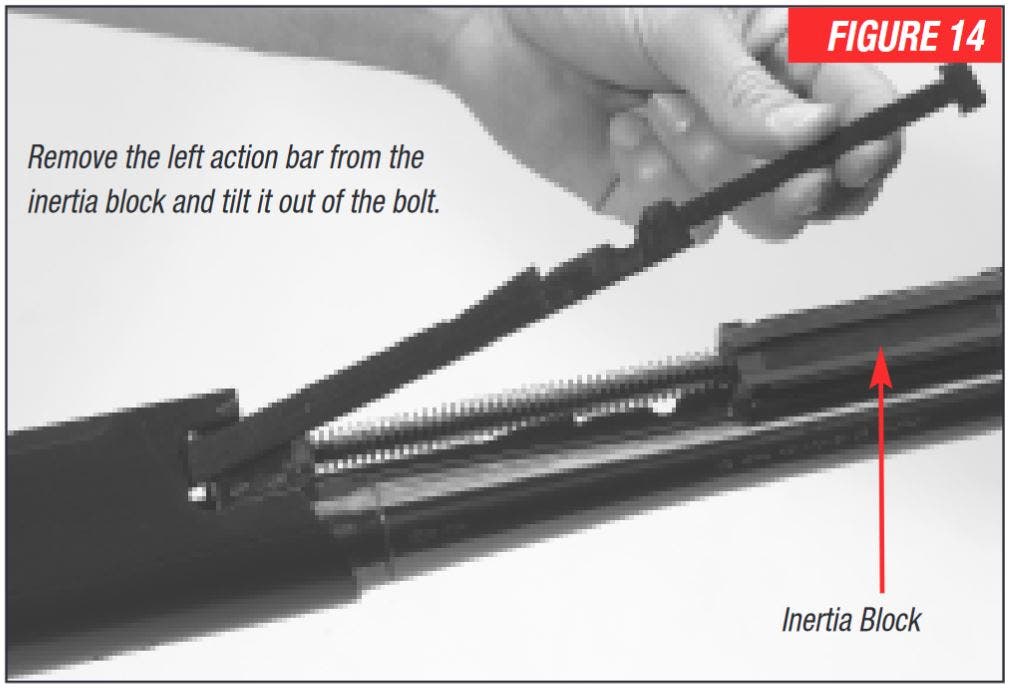
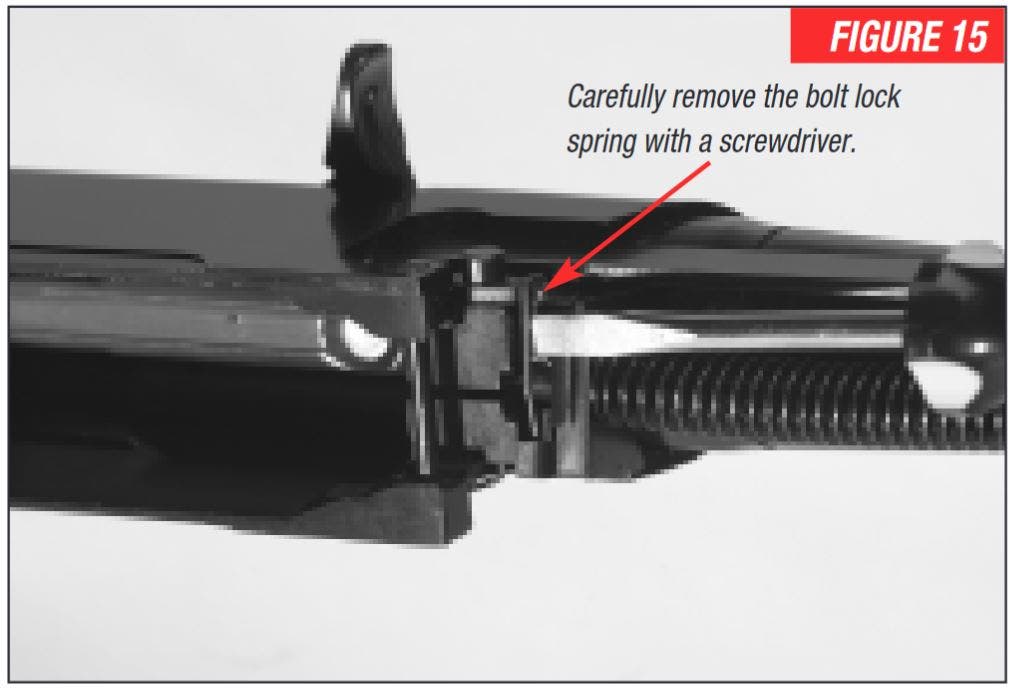
6. Remove the action bars while the bolt is still closed. To remove the left action bar (the side opposite the bolt handle), pull the forward end away from its slot on the inertia block. Lower and pull the action bar forward and out of the receiver (Figure 14). Remove the right action bar by first removing the bolt lock spring from the bolt lock using a flathead screwdriver (Figure 15).
Remove the bolt lock pin (Figure 16) and pull the bolt lock forward and out of the receiver. You can then pull the forward end of the right action bar away from the inertia block, and lower and pull the action bar out of the receiver.
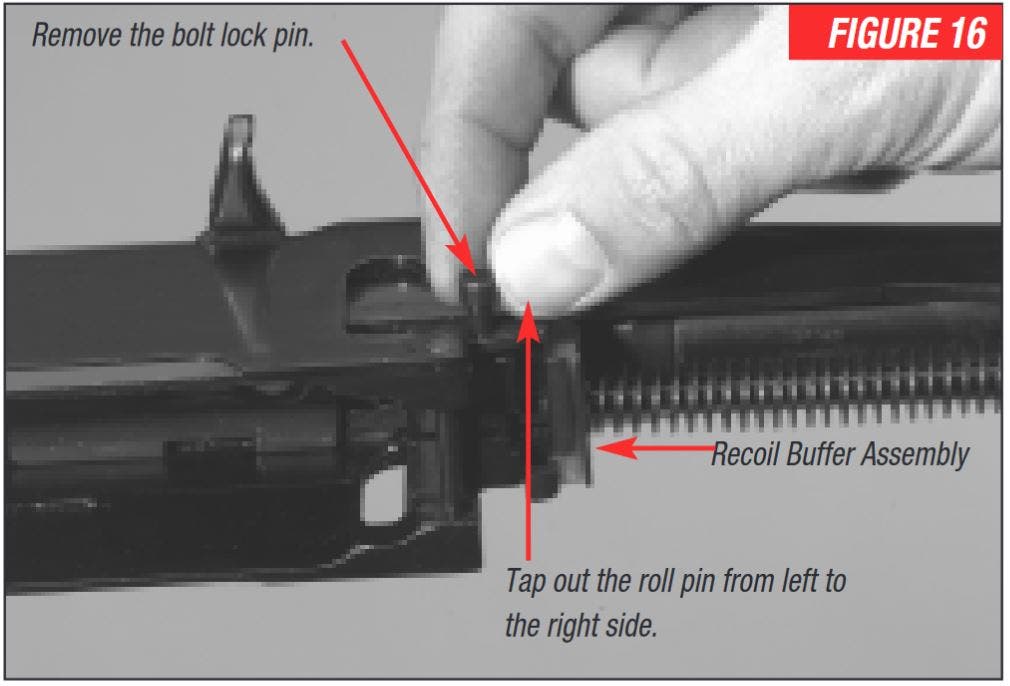
7. With a small punch, gently tap out the roll pin located just forward of the bolt lock pin. NOTICE: The roll pin must be tapped out from the left to the right side.
8. Grasp the action spring securely and compress it forward enough to expose the action spring guide.
9. While maintaining tension on the action spring, slide the action spring guide forward slightly and remove the recoil buffer assembly.
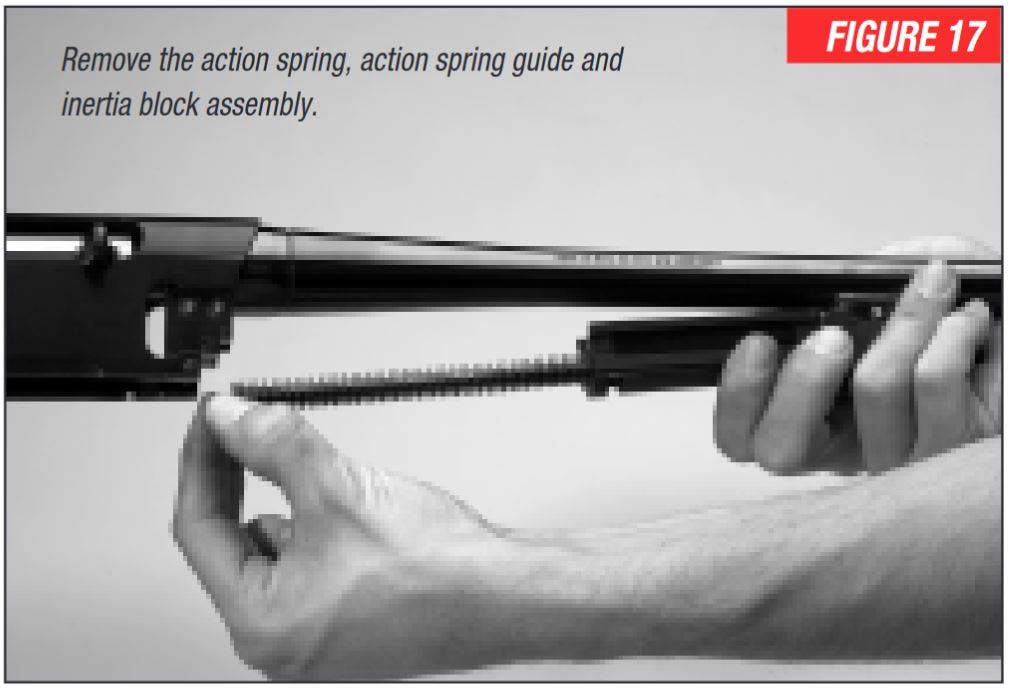
10. Continue to maintain tension on the action spring and slide the action spring guide fully rearward. The action spring and action spring guide assembly can now be removed, along with the inertia block and gas piston, by pulling the action spring down and away from the barrel (Figure 17). Remove the assembly slowly as the action spring is under tension and care should be used to avoid injury and lost mechanical parts. NOTE: The gas piston must be inside the gas cylinder in order to remove the action spring guide.
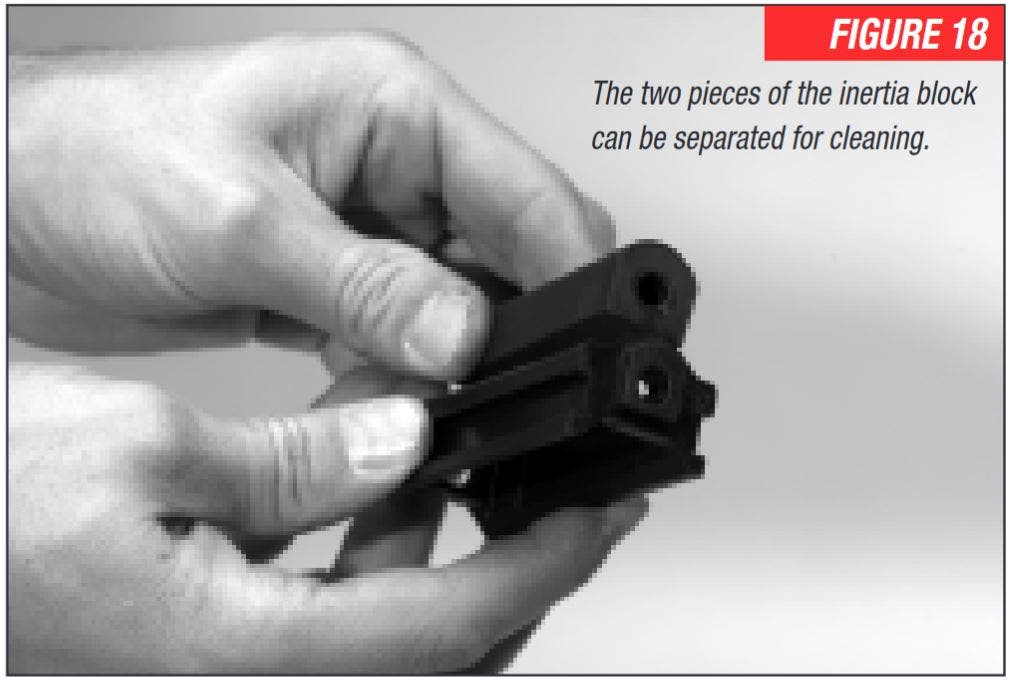
11. The inertia block can then be disassembled for cleaning by lifting the center block out of the frame (Figure 18). After cleaning, reassemble the inertia block by replacing the center section inside the frame, making sure the larger holes on the end of the two pieces are in alignment.
12. Remove the piston by pulling it rearward out of the gas cylinder. The gas cylinder can now be examined for accumulations of residue. Residues in the gas cylinder and on the gas piston should be thoroughly removed with a good quality powder solvent or bore cleaner. If residues are heavy, remove them by scrubbing the gas cylinder with a 20 gauge shotgun bronze wire bore brush and a good powder solvent.
13. The gas piston, gas cylinder, and other parts covered by the forearm should be wiped with a lightly oiled cloth after cleaning. The gas cylinder interior and the gas piston should not be oiled beyond this.
Reassembly
Reassembly
1. Replace the piston back into the gas cylinder.
2. Slide the action spring over the action spring guide and insert the action spring/action spring guide assembly into the larger hole in the inertia block. NOTE: The rounded end of the action spring guide is inserted into the gas piston. The opposite end is flat, with a hole. This end fits to the receiver, with the roll pin passing through the hole in the action spring guide.
3. Position the action spring/guide/inertia block assembly underneath the barrel. Slide the rounded end of the action spring guide into the piston while compressing the action spring and moving the assembly into position on the receiver.
4. Compress the spring and replace the recoil buffer assembly.
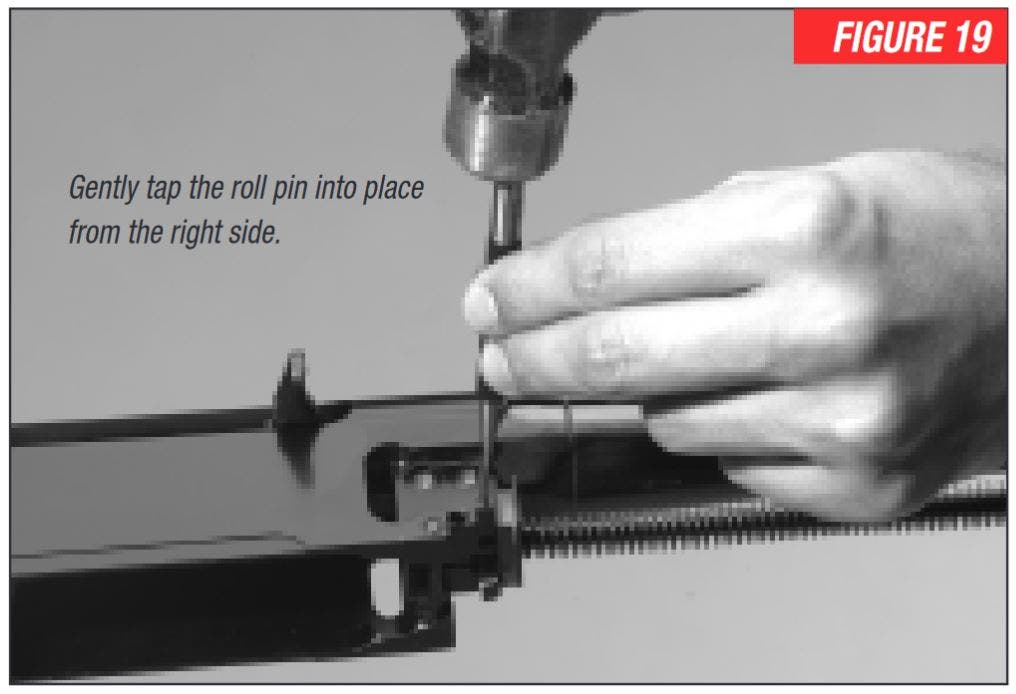
5. Line up the holes in the receiver and action spring. Insert the tapered end (smaller end) of the roll pin into the right side of the receiver and gently tap it into place (Figure 19).
WARNING: FAILURE TO PROPERLY INSTALL THE ROLL PIN THROUGH THE ACTION SPRING GUIDE COULD CAUSE THE FIREARM TO MALFUNCTION, CAUSING SERIOUS INJURY TO YOU AND OTHERS.
6. To replace the action bars, place the bolt in its most forward position. It is helpful to leave the magazine out so you can attach the action bars to the bolt.
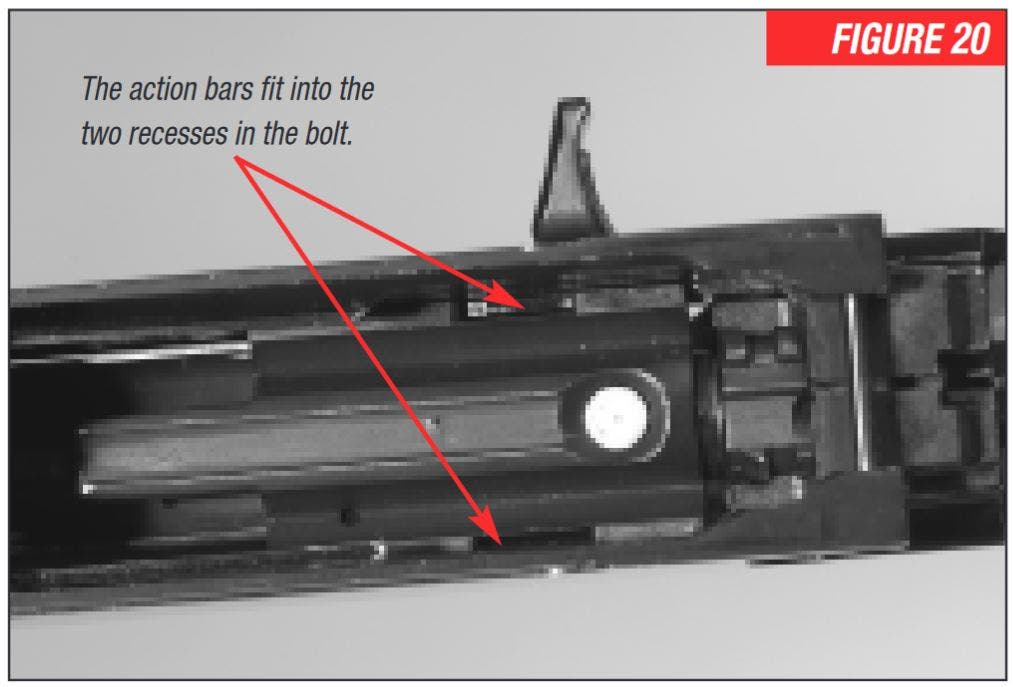
7. Place the projecting section of each action bar in its corresponding slot in the bolt (Figure 20) before the action bars are fit onto the inertia block. The action bars are interchangeable. It may be necessary to pull the inertia block slightly rearward to engage the action bars.
8. Replace the bolt lock in the receiver and align the hole in the bolt lock with the hole in the receiver. Insert the bolt lock pin.
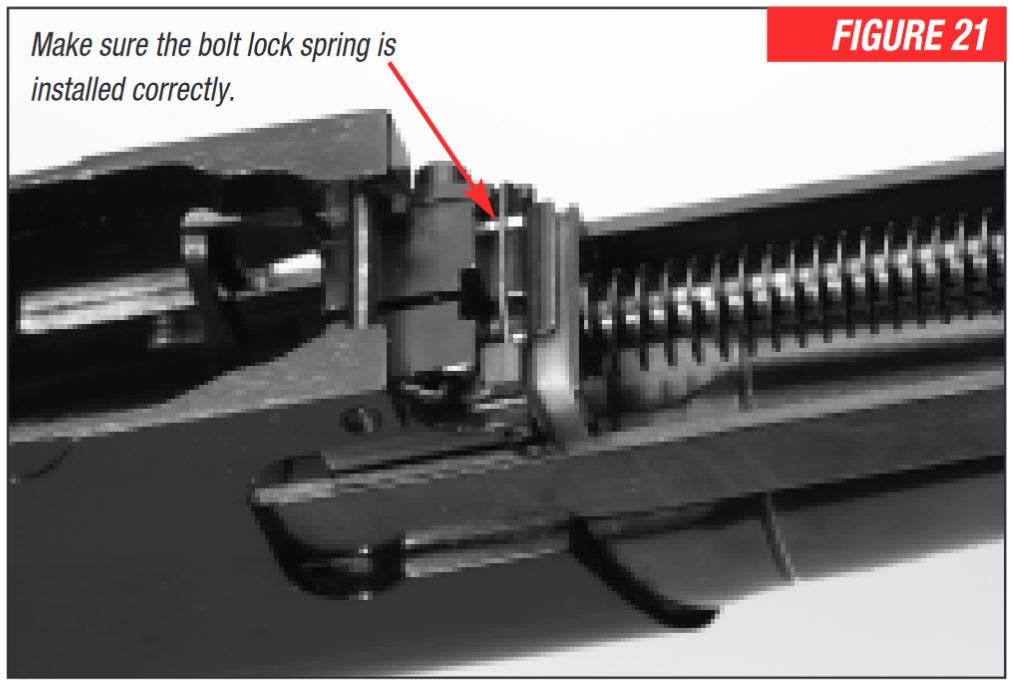
9. Lock the bolt release spring onto the bolt lock (Figure 21) .
10. Replace the forearm by sliding it onto the receiver. Be very careful with reassembly of the forearm, since it can be broken if forced into position incorrectly. Turn the forearm attachment nut in a clockwise direction until it is firmly seated into the receiver. Do not overtighten.
11. Replace the sling swivel stud eyelet using a 9mm wrench or by passing a small instrument, such as a screwdriver or punch, through the sling swivel eyelet to tighten the sling swivel. Take care not to scratch the forearm. Turn the sling swivel in a clockwise direction to tighten.
Cleaning and Maintenance Suggestions
Cleaning and Maintenance Suggestions
PLEASE TAKE NOTE OF THE FOLLOWING INFORMATION BEFORE CLEANING YOUR RIFLE.
CLEANING PARTS WITH SPECIAL FINISHES
CLEANING PARTS WITH SPECIAL FINISHES
Be especially careful when cleaning guns with camouflage, Dura-Touch® Armor Coating and other special finishes. Always prevent these surfaces from coming in contact with cleaning solvents, barrel scrubbers and other strong chemicals. It is preferable to clean these surfaces with a light gun oil containing no solvents or with a damp cloth and mild dish soap (be sure to keep water out of the action). When cleaning your firearm’s bore and action, protect the external finishes from any contact with chemicals used. Also avoid any contact between external finishes and other strong chemicals like those found in DEET-containing insect repellents, sunscreens, etc. Damage to camouflage, Dura-Touch and other finishes caused by chemicals is irreversible and unrepairable.
BEFORE PERFORMING ANY CLEANING PROCEDURES, ALWAYS MAKE CERTAIN YOUR RIFLE IS COMPLETELY UNLOADED, THERE ARE NO CARTRIDGES IN THE CHAMBER, ACTION/FEED AREAS AND THAT THE MAGAZINE IS REMOVED.
Your rifle will function better and more reliably over a longer period of time if it is properly maintained and kept clean. You should clean your rifle after each day of shooting and more often if it becomes excessively dirty.
A minimum cleaning includes wiping down the action and oiling key parts. Most regular maintenance will also include cleaning the barrel. If you encounter a function problem, be sure to give your gun a thorough cleaning to see if that solves the problem before seeking the services of our service facility or a qualified gunsmith.
BE CERTAIN YOUR GUN’S CHAMBER IS UNLOADED AND THE MAGAZINE IS REMOVED. ALWAYS WEAR PROTECTIVE SAFETY GLASSES DURING ALL CLEANING PROCEDURES. KEEP AMMUNITION AWAY FROM THE CLEANING AREA. NEVER TEST THE FUNCTION OF YOUR FIREARM WITH LIVE AMMUNITION.
CLEANING SUGGESTIONS
CLEANING SUGGESTIONS
1. BE CERTAIN THE RIFLE IS COMPLETELY UNLOADED AND THE SAFETY IS IN THE “ON SAFE” POSITION. Again, to unload your rifle, remove the magazine and eject any live cartridge in the chamber by pulling the operating handle fully to the rear.
2. Install an empty magazine and pull the bolt fully rearward with the operating handle. The bolt will be held in the open position if the magazine is installed. With the bolt locked open, remove the empty magazine.
3. Using a rifle cleaning rod with tip and patch large enough for a snug fit in the bore, insert the rod and patch in the barrel from the muzzle end and run back and forth several times. Care should be exercised to ensure that neither the cleaning rod nor the handle strikes the crown of the muzzle, as damage to this area can adversely affect the accuracy of the rifle. A muzzle protector can be purchased separately from your local firearms dealer to help protect the muzzle crown while cleaning the barrel of your rifle.
4. Inspect the chamber and bore for powder fouling. A normal amount of powder residue can be expected and is not serious. It can usually be removed by repeating step 3, using a patch saturated with nitro-solvent. If, or when, fouling should become heavy, it can be removed with a brass bore brush. Dip the brush in nitro-solvent and scrub the chamber and bore until the fouling is removed. To prevent brass bristles from breaking off, the brush should be pushed completely through the bore before being withdrawn. Your rifle will operate smoothly and reliably with a clean bore and chamber.
5. To maintain the utmost accuracy of your rifle it is recommended you clean the bore with a copper solvent. Modern bullet jackets are made mainly of copper and zinc. Copper and zinc residue sticks to the bore and require more frequent cleaning. Magnum calibers will also require more frequent inspection and cleaning. Swab the bore of your rifle with a good copper solvent using the product manufacturer’s recommended procedure.
6. After fouling has been removed, wipe the bore dry. Then pass a lightly oiled patch through the barrel for preservation. A fine, light gun oil is recommended. The barrel and action should be inspected thoroughly to be certain no cleaning patches have been inadvertently left in them.
7. The interior of the receiver and the bolt should periodically be wiped with a clean rag. This is best done with the trigger group removed (see “Removing the Trigger Group”), and with the empty magazine removed and the bolt in its open position. Any dried oil in these areas or on the magazine follower should be removed. Follow this cleaning by applying a very light film of oil on the affected parts.
8. Wipe all exposed metal surfaces with an oiled cloth, making sure to wipe gun clean of all finger marks. Finger marks should be removed because they provide a place where moisture can accumulate.
9. Lightly oil the bolt guide lugs and guide rails. Ordinary good judgment will, of course, indicate that the metal of the gun should receive a light film of oil any time the rifle has been exposed to weather or handling. This is very important and must be done with every firearm. Remember, the fitted surfaces of the receiver and action mechanisms must always have a thin film of oil. Make sure that the surfaces of the breech bolt are especially clean and lightly oiled with a high quality gun oil. Do not use pure silicone or lanolin.
10. Inspect the barrel and chamber. Make certain that no patches have been inadvertently left in them. Remove any that remain.
11. The wood surfaces of your rifle can also be wiped lightly with fine oil, or you can apply a quality wood or furniture polish to the stock and forearm. Using one of these methods (not both), will enhance the beauty and durability of your rifle.
12. When transporting your rifle, store it in a quality protective case to prevent scratches and dents. Store your rifle in a cool, dry place to prevent corrosion. Store your rifle and ammunition separately, away from children.
MAKE SURE YOUR RIFLE IS UNLOADED AND ALWAYS STORE AMMUNITION SEPARATELY AND AWAY FROM ALL FIREARMS.
OTHER CLEANING SUGGESTIONS
OTHER CLEANING SUGGESTIONS
- Never pour large quantities of oil into the receiver or other parts of your rifle. It can drain down into the wood and soften it, causing permanent damage and loosening of the stock.
- After extended periods of heavy use, your gun should be taken to a qualified gunsmith to have the action disassembled for professional cleaning and lubrication.
NEVER ATTEMPT TO TAKE YOUR RIFLE APART FURTHER THAN EXPLAINED IN THIS OWNER’S MANUAL.
Your rifle is a specialized, finely-fitted mechanism. You may permanently mar it by attempting to disassemble the inner mechanism assemblies. If further disassembly for service or cleaning is required, take your gun to a Winchester Rifles and Shotguns Authorized Repair Center or a qualified gunsmith as explained under “Parts, Service, Repair and Questions”.
Magazine Maintenance
Magazine Maintenance
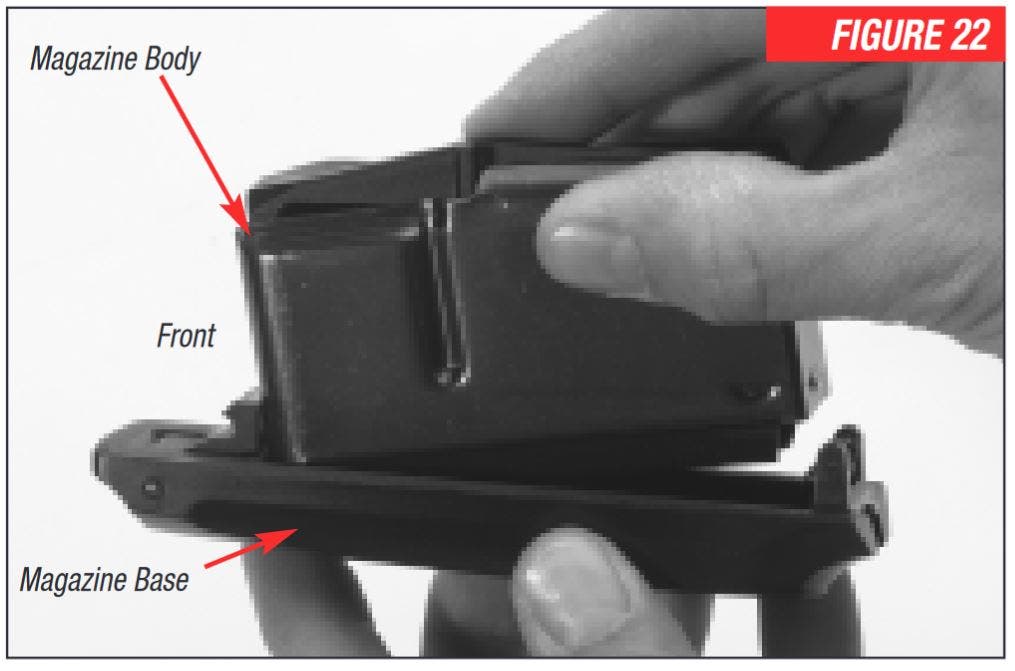
The magazine is highly reliable and requires very little maintenance. Should the body and base of the magazine become separated, follow the reassembly instructions below.
DISASSEMBLY
DISASSEMBLY
1. BE SURE TO USE EYE PROTECTION WHENEVER DISASSEMBLING YOUR MAGAZINE DUE TO SPRING-TENSIONED PARTS. Release the rear of the magazine base with one hand while lifting the rear of the magazine body away with the other hand.
2. Clean the magazine components using a plastic-safe solvent and lightly oil all components with a plastic- safe lubricant.
MAGAZINE REASSEMBLY
MAGAZINE REASSEMBLY
1. Insert the tab on the front of the magazine into the slot on the front of the magazine base (Figure 22).
2. Lower the rear of the magazine body into the magazine base until the spring retains the magazine in the base. The magazine is now ready for use.
Scope Mounting and Sight Adjustment
Scope Mounting and Sight Adjustment
The Super X™ Rifle is available with or without open sights. Always unload your rifle before making any sight adjustments.
SCOPE MOUNTING
SCOPE MOUNTING
The receiver of your rifle is drilled and tapped for scope bases. When installing scope bases, follow the manufacturers mounting instructions supplied with the scope bases, rings and/or the scope.
SIGHT ADJUSTMENT
SIGHT ADJUSTMENT
When making sight adjustments, always move the rear sight in the same direction you want the point of the bullet impact to move. If you want the point of bullet impact to move to the left, move the rear sight setting to the left. If you want to raise the point of impact, raise your rear sight setting.
1. If horizontal or windage correction is desired, loosen or tighten the screw on the side of the rear sight notch to the desired setting. Each click represents approximately 1⁄4" movement of the point of impact at 100 yards.
2. If vertical correction is desired, loosen or tighten the vertical adjustment screw located in front of the rear sight notch. Each click on the sight represents approximately 3⁄4" movement of the point of impact at 100 yards.
REPLACING FIBER-OPTIC ELEMENTS
REPLACING FIBER-OPTIC ELEMENTS
If the fiber-optic elements in the sights are lost or damaged, replacements are available from the Winchester Rifles and Shotguns Customer Service Department at (800) 945-5237. Should the fiber-optic elements of the front sight need to be replaced, perform the following procedure:
1. Cut and remove the fiber-optic element from the sight.
2. Insert the new fiber-optic element into the sight rings and center it in the sight.
3. With a lighter, carefully melt both ends of the fiber-optic element to secure it in the sight rings.
BEFORE USING THE LIGHTER, REMOVE ALL AMMUNITION, PROPELLANT POWDER, PRIMERS AND FLAMMABLE CHEMICALS FROM THE WORK AREA.
Should the fiber-optic elements of the rear sight need to be replaced, perform the following procedure:
1. Cut and remove the fiber-optic element from the sight.
2. Unscrew the rear sight windage adjustment screw completely. Do not lose the spring inside the sight. Remove the fiber-optic assembly from the sight base.
3. Insert the new fiber-optic element into the sight rings and trim both ends of the fiber-optic so approximately 1⁄16" protrudes from each end.
4. With a lighter, carefully melt both ends of the fiber-optic element to secure it in the sight rings.
5. Reassemble the sight in the reverse order of the previous steps. It will be necessary to sight-in your rifle to obtain zero
Parts, Service, Repair and Questions
Parts, Service, Repair and Questions
If your Winchester rifle or shotgun should ever need service or repair, it is often best to utilize one of our Authorized Repair Centers. In some cases it is appropriate to use the Winchester Rifles and Shotguns Service Center in Arnold, Missouri. A list of Authorized Repair Centers was included with your new firearm. If you need a new listing, contact us. We can help you determine the best place to service your firearm.
Parts listings, Authorized Repair Center lists, service procedures, service/repair form and general product information are also found on the Web at: www.winchesterguns.com.
When returning your firearm for servicing, you must do the following:
1. Be sure it is completely unloaded.
2. Remove the scope or other optics.
3. Package it securely in a cardboard container.
4. When sending your firearm, enclose the service/repair form available at www.winchesterguns.com or a letter that clearly describes the trouble experienced, the ammunition used and the repairs desired. Also include your name and a daytime phone number where you can be reached.
5. If convenient, send a copy of the service/repair form or letter to us separately.
6. Never return ammunition with your firearm. It is against postal and most commerce regulations.
PARTS, SERVICE, REPAIR STATUS, AND TECHNICAL QUESTIONS:
Winchester Repeating Arms Parts and Service
3005 Arnold Tenbrook Road
Arnold, MO 63010-9406
Phone: (800) 322-4626
GENERAL PRODUCT AND HISTORICAL QUESTIONS:
Winchester Repeating Arms Customer Service
275 Winchester Avenue
Morgan, UT 84050-9333
Phone: (800) 945-5237
customersupport@winchesterguns.com
WARNING: PARTS ARE MADE FOR WINCHESTER BRAND FIREARMS MANUFACTURED BY OR FOR WINCHESTER REPEATING ARMS, AND SHOULD NOT BE USED IN OTHER FIREARMS, EVEN THOUGH MODELS MAY BE SIMILAR. IMPROPERLY FITTED PARTS MAY BE DANGEROUS. FAILURE TO FOLLOW THIS WARNING MAY CAUSE INJURY OR DEATH AND CAUSE DAMAGE TO YOUR FIREARM.
WEBSITE INFORMATION
WEBSITE INFORMATION
An information resource for Winchester Repeating Arms can be found online at winchesterguns.com.
- List of Authorized Repair Centers.
- Customer Service information.
- Firearm Service/Repair Form.
- Answers to many technical and historical questions.
- Links to helpful sites.
CERTAIN STATES REQUIRE, BY LAW, THAT THEIR OWN SPECIFIED WARNING NOTICES BE INCLUDED BY THE MANUFACTURER, DISTRIBUTOR, OR RETAIL DEALER WITH FIREARMS SOLD IN THAT STATE. WINCHESTER SELLS ITS PRODUCTS IN COMPLIANCE WITH APPLICABLE LAWS AND REGULATIONS. BECAUSE OUR PRODUCTS MAY BE SOLD IN THESE STATES, WE INCLUDE THE FOLLOWING:
State-By-State Warnings
State-By-State Warnings

CALIFORNIA
Firearms must be handled responsibly and securely stored to prevent access by children and other unauthorized users. California has strict laws pertaining to firearms, and you may be fined or imprisoned if you fail to comply with them. Visit the Website of the California Attorney General at https://oag.ca.gov/firearms for information on firearm laws applicable to you and how you can comply.
Prevent child access by always keeping guns locked away and unloaded when not in use. If you keep a loaded firearm where a child obtains and improperly uses it, you may be fined or sent to prison.
If you or someone you know is contemplating suicide, please call the National Suicide Prevention Lifeline at 1-800-273-TALK (8255).

Las armas de fuego deben de ser manipuladas responsablemente y almacenadas en sitios seguros para prevenir el acceso a ellas por parte de niños y personas sin autorización. California cuenta con leyes estrictas sobre las armas de fuego, y puede ser multado y encarcelado si no las obedece. Visite la página web de California Attorney General, https://oag.ca.gov/firearms para más información sobre cómo cumplir con las leyes de armas de fuego.
Prevenga el acceso de los niños a las armas de fuego manteniéndolas siempre en un lugar seguro, bajo llave y descargadas cuando no estén en uso. Si usted deja un arma cargada al alcance de un niño, y éste la utiliza indebidamente,usted podría ser multado e incluso enviado a la cárcel.
Si usted o alguien que conoce está pensando en suicidarse, llame a la línea Nacional de Prevención del Suicidio al 1-800-273-TALK (8255).
CONNECTICUT
“UNLAWFUL STORAGE OF A LOADED FIREARM MAY RESULT IN IMPRISONMENT OR FINE.”
FLORIDA
“IT IS UNLAWFUL, AND PUNISHABLE BY IMPRISONMENT AND FINE, FOR ANY ADULT TO STORE OR LEAVE A FIREARM IN ANY PLACE WITHIN THE REACH OR EASY ACCESS OF A MINOR UNDER 18 YEARS OF AGE OR TO KNOWINGLY SELL OR OTHERWISE TRANSFER OWNERSHIP OR POSSESSION OF A FIREARM TO A MINOR OR A PERSON OF UNSOUND MIND.”
MAINE
“ENDANGERING THE WELFARE OF A CHILD IS A CRIME. IF YOU LEAVE A FIREARM AND AMMUNITION WITHIN EASY ACCESS OF A CHILD, YOU MAY BE SUBJECT TO FINE, IMPRISONMENT OR BOTH. KEEP FIREARMS AND AMMUNITION SEPARATE. KEEP FIREARMS AND AMMUNITION LOCKED UP. USE TRIGGER LOCKS.”
MARYLAND
“WARNING: Children can operate firearms which may cause death or serious injury. It is a crime to store or leave a loaded firearm in any location where an individual knew or should have known that an unsupervised minor would gain access to the firearm. Store your firearm responsibly!”
MASSACHUSETTS
“WARNING FROM THE MASSACHUSETTS ATTORNEY GENERAL: This handgun is not equipped with a device that fully blocks use by unauthorized users. More than 200,000 firearms like this one are stolen from their owners every year in the United States. In addition, there are more than a thousand suicides each year by younger children and teenagers who get access to firearms. Hundreds more die from accidental discharge. It is likely that many more children sustain serious wounds, or inflict such wounds accidentally on others. In order to limit the chance of such misuse, it is imperative that you keep this weapon locked in a secure place and take other steps necessary to limit the possibility of theft or accident. Failure to take reasonable preventative steps may result in innocent lives being lost, and in some circumstances may result in your liability for these deaths.”
“IT IS UNLAWFUL TO STORE OR KEEP A FIREARM, RIFLE, SHOTGUN OR MACHINE GUN IN ANY PLACE UNLESS THAT WEAPON IS EQUIPPED WITH A TAMPER RESISTANT SAFETY DEVICE OR IS STORED OR KEPT IN A SECURELY LOCKED CONTAINER.”
NEW JERSEY
“IT IS A CRIMINAL OFFENSE TO LEAVE A LOADED FIREARM WITHIN EASY ACCESS OF A MINOR.”
NEW YORK CITY, NEW YORK
“THE USE OF A LOCKING DEVICE OR SAFETY LOCK IS ONLY ONE ASPECT OF RESPONSIBLE WEAPON STORAGE. ALL WEAPONS SHOULD BE STORED UNLOADED AND LOCKED IN A LOCATION THAT IS BOTH SEPARATE FROM THEIR AMMUNITION AND INACCESSIBLE TO CHILDREN AND ANY OTHER UNAUTHORIZED PERSONS. NEW YORK CITY LAW PROHIBITS, WITH CERTAIN EXCEPTIONS, ANY PERSON FROM ACQUIRING MORE THAN ONE FIREARM, OR MORE THAN ONE RIFLE OR SHOTGUN, WITHIN A 90-DAY PERIOD.”
NORTH CAROLINA
“IT IS UNLAWFUL TO STORE OR LEAVE A FIREARM THAT CAN BE DISCHARGED IN A MANNER THAT A REASONABLE PERSON SHOULD KNOW IS ACCESSIBLE TO A MINOR.”
Any person who resides in the same premises as a minor, owns or possesses a firearm, and stores or leaves the firearm (i) in a condition that the firearm can be discharged and (ii) in a manner that the person knew or should have known that an unsupervised minor would be able to gain access to the firearm, is guilty of a Class 1 misdemeanor if a minor gains access to the firearm without the lawful permission of the minor’s parents or a person having charge of the minor and the minor:
- Possesses it in violation of G.S. 14-269.2(b)
- Exhibits it in a public place in a careless, angry, or threatening manner;
- Causes personal injury or death with it not in self defense; or
- Uses it in the commission of a crime.
TEXAS
“IT IS UNLAWFUL TO STORE, TRANSPORT, OR ABANDON AN UNSECURED FIREARM IN A PLACE WHERE CHILDREN ARE LIKELY TO BE AND CAN OBTAIN ACCESS TO THE FIREARM.”
WISCONSIN
“IF YOU LEAVE A LOADED FIREARM WITHIN THE REACH OR EASY ACCESS OF A CHILD YOU MAY BE FINED OR IMPRISONED OR BOTH IF THE CHILD IMPROPERLY DISCHARGES, POSSESSES, OR EXHIBITS THE FIREARM.”
PLEASE CONSULT YOUR LOCAL FEDERALLY LICENSED FIREARMS RETAILER, STATE POLICE, OR LOCAL POLICE FOR ADDITIONAL WARNINGS THAT MAY BE REQUIRED BY LOCAL LAW OR REGULATION. FIREARMS REGULATIONS CHANGE CONSTANTLY AND YOUR LOCAL AUTHORITIES ARE THE BEST SOURCE FOR THE MOST CURRENT INFORMATION ON SUCH LEGAL MATTERS.