
SX4 Cleaning & Care Guide — Maintain Your Autoloader
Published July 2, 2026 by Jace Bauserman
Many hunters expect and neglect. Shotgun users, including me, are the worst. We expect our shotguns to thunder each time we pull the trigger. We expect spent hulls to kick far and for the action to quickly slam a fresh shell into the chamber.
Here’s the thing, though, we shoot cases, not boxes, of low-brass #7 and #8 shotshells during September, when doves are on the menu. Many of us then use that same shotgun, our favorite semi-auto, in pursuit of pheasant, quail, and other upland birds. And, of course, we’ve all had those special days when fowl pours in on the X, and the smell of spent powder lingers in the air from the day’s first volley until the last.
Shotgun hunting often provides fast, high-volume shooting in challenging environments. Dirt, tiny pieces of grain, twigs, etc., tend to find their way into the inner parts of our autoloaders. Still, we expect that shotgun to perform flawlessly.
There’s a reason Winchester Repeating Arms’ SX4 is one of the best-selling autoloaders of all time. SX4 autoloaders come in various models, many of which are designed for specific pursuits. These autoloaders sport excellent ergonomics and features that make them impervious to the elements.
Perhaps the SX4’s greatest feature, and one that has survived several Super-X evolutions, is the self-compensating gas operating system. There’s a reason this system, known as Active Valve, was carried over from the SX2 and SX3. That reason: It’s ultra-effective.
This piston-operated gas system is self-adjusting, meaning that the mechanism automatically regulates gas pressure, allowing the SX4 to cycle light target/dove loads as well as heavy 3-1/2-inch magnum loads.
How?
When firing heavy loads, the piston adjusts to use only the amount of gases necessary to run the action. Unneeded gases are vented through vents located at the top and front of the forearm. By controlling bolt speed, felt recoil is reduced, and excessive wear and tear on the action is minimized. When firing lighter loads, the piston uses all available gas to ensure reliable cycling. The Active Valve Gas System makes the SX4 a do-all shotgun. There’s a reason many waterfowl guides, including those that hunt the salt, have SX4 shotguns for rent.
The system, because it directs gas and carbon fouling upward and forward, reduces fouling of the action and internal parts. And, by metering the gas and spreading the pressure out, the Active Valve Gas System keeps felt recoil down when shooting heavy loads.
What Does This Mean for the SX4 User?

It means you have a well-built, good-shooting shotgun that will perform even if you don’t adhere to a strict maintenance schedule. The problem is that we’ve been spoiled. I’ve had hunts in sub-zero temps, known my SX4 was dirtier than sin, and still, the gun goes boom, hulls kick far, and there is no delay when I make a follow-up shot or move to another bird. It also means we have a value-priced autoloader that we tend to mistreat. No matter how good a particular product is, mistreatment eventually leads to some type of failure.
Yes, even the best shotguns will fail when not properly cared for. Why do you replace the filter in your furnace? Maintenance and care. Why do change the oil in your car? Maintenance and care. As good as SX4 shotguns are, they too require maintenance and care.
Is My SX4 Easy to Clean?
Yes. You don’t have to be a gunsmith or even very mechanically inclined. The shotgun comes apart easily and is a breeze to put back together. Follow the list below and give your SX4 the TLC it deserves. Or, better yet, follow the instructions in the owner’s manual that came with your shotgun or download it from the website.
PRO TIP: Stay organized. As you begin cleaning, make sure you have plenty of space to organize parts. Go slow and steady the first few times you disassemble your SX4.
- Always keep your shotgun pointed in a safe direction. Before taking it apart, ensure the “safety” is in the on safe position. Inspect the chamber, feed mechanism, and magazine to be absolutely certain your shotgun is unloaded.
- Place the shotgun on a clean surface. A gun-cleaning pad is recommended.
- Remove the end cap, pull the forearm forward and off the magazine tube. Next, pull the bolt back, wiggle the barrel slightly, and remove it. With the barrel off, don’t let the bolt travel forward. The bolt handle will strike the front of the ejection port and may damage the receiver.
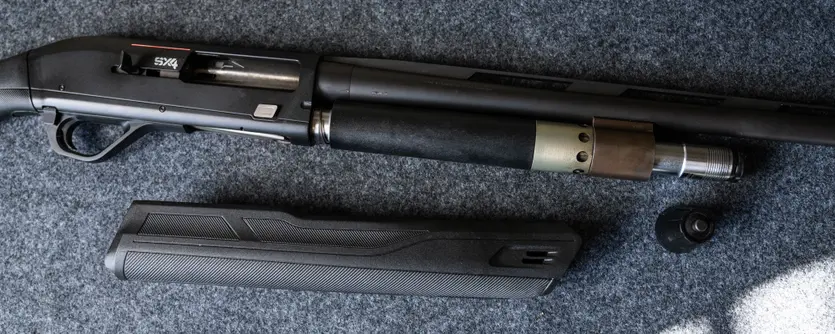
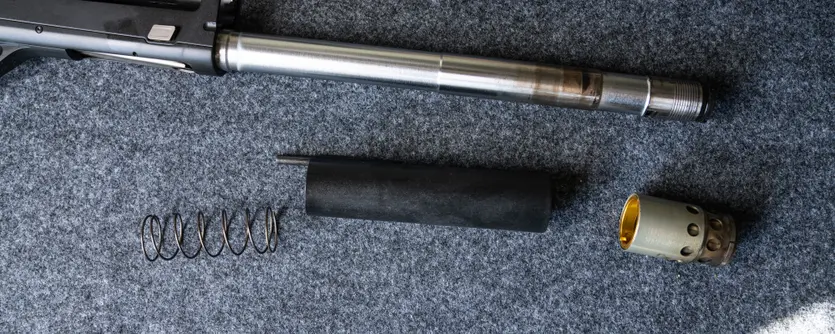
- Slide the gas piston, piston sleeve, and spring off the magazine tube.
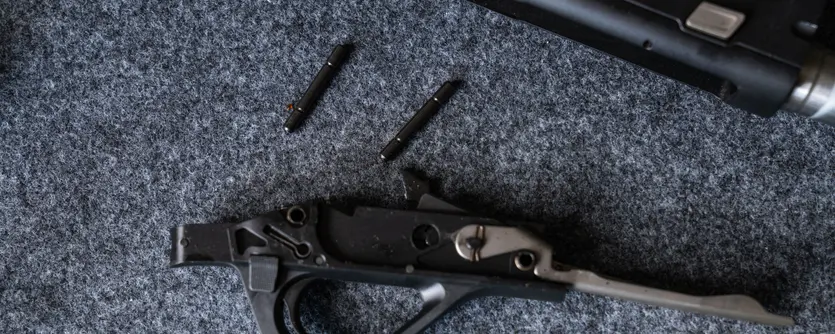
- Next, take advantage of the drop-out trigger group. With the bolt in the forward position, use a punch to push out the trigger-guard retaining pins, then remove the trigger assembly.
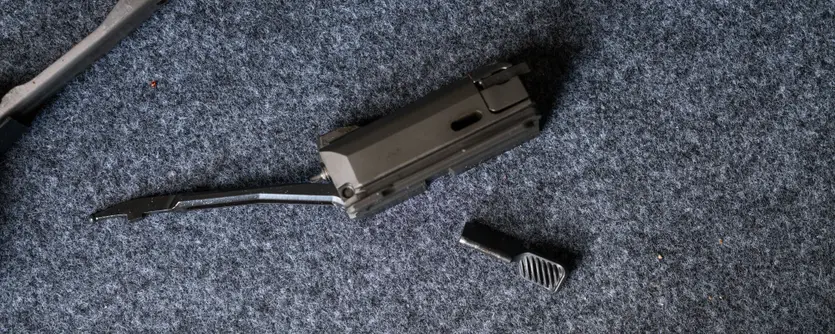
- Lastly, you want to remove the bolt. Pull straight out on the bolt handle to remove it, then the bolt is free to slide forward and out of the receiver. With 20-gauge guns, you need to push in the shell stop, found on the underside of the bolt, to release the bolt handle. Again, crack open your owner’s manual to make this easier.
- Your SX4 is now broken down and ready for a bath.
How Do I Clean My SX4?
I’ve noticed the magazine tube, gas piston, and piston sleeve tend to be the dirtiest. Since they are removed, I like to take them outside, lay them on a piece of cardboard, and saturate them in a bore cleaner spray. Don’t rush this. Let the bore cleaner work, then use a non-scratch pad (think GREEN Scotch-Brite pad) to scrub off the black carbon buildup. This will take a bit of elbow grease, but it’s essential for shotgun longevity. If you clean your SX4 often, this process won’t be nearly as labor-intensive. When clean, rinse away any debris on these parts off with a gun safe aerosol degreaser that won’t harm plastic parts.
Next, slowly run a patch soaked in solvent through the bore and out the end of the muzzle. I prefer to use a twisting motion. Every shooter is different, but I like to let that first patch work a bit, run a couple more solvent-dipped patches through, and then use a brass or bronze bore brush. Brass and bronze brushes (gauge specific) crush carbon fouling. After the brush, I run dry patches through the bore and out the muzzle until they are clean. Some shotgun goers start the process with the brush, then use solvent and dry patches. I believe I get my barrel cleaner by starting with the solvent-dipped patches.
With the chamber and bore clean, remove the choke tube and give it the same treatment as the barrel. Use a rag and solvent to clean the threads inside the barrel. Be careful using a brush here. It’s easy to break off bristles in the threads, and this makes installing your choke tube very difficult. When clean, lightly oil the threads in the barrel and on the choke tube and reinstall it in the barrel. With the choke tube installed, lightly oil a patch and run it through the barrel. This thin coat of oil will prevent corrosion in the bore.
Now look inside the receiver. Do you see any twigs, debris, etc.? If so, remove them by hand, brush, or tweezers. Then spray the inside of the receiver with the gun cleaner of your choice, and use a toothbrush to scrub it, much like you would your teeth.
Spray the bolt and trigger group with a cleaner/degreaser. Use your toothbrush again to scrub away any fouling and wipe both clean. Make sure the trigger group and bolt are dry. Never dip either into a solvent tank.
Lastly, you need to lubricate everything before putting it back together. Remember to use oil sparingly; too much oil will attract all the junk you just tweezed out of your gun.
- Use a lightweight gun oil on the bolt and the bolt slide, especially along the rails where it rides in the receiver. Put a drop of oil in the slot in the receiver where the piston sleeve guide rod slides.
- Oil the trigger group. Lube up the shiny spots, as these indicate points of contact, and pivot points. A little oil goes a long way, wipe off extra.
- Apply a thin film of oil to the magazine tube.
Bit By Bit, Putting It Together. This Is How You Reassemble Your SX4.
Reassembling your SX4 is just reverse order. For the people in the back, use your owner’s manual if you get stuck.
- Slide the bolt into the front of the receiver, making sure that the rails on the bolt fit into the channels inside the receiver. This next part is tricky. The slide link at the rear of the bolt fits into a cup at the rear of the receiver. You may need a flashlight to help you guide the slide link into its home.
- Insert the bolt handle into the bolt until it clicks. If it’s a 20, you need to push in on the aforementioned shell stop. Pull the bolt to the rear to ensure the slide link is where it needs to be. If the bolt won’t go back, check the slide link and make sure it’s in the cup.
- Carefully put the bolt in the forward position. Remember to ease it forward, or else the bolt handle will strike the front of the ejection port and make you less happy.
- Drop the trigger group into the receiver and align the two pin holes. Push or tap the pins in.
- Pull the bolt to the rear until it locks back. Install the piston sleeve spring, piston sleeve (12-Gauge: Rod goes in the non-ejection port side of the receiver, 20-Gauge the rod goes into the ejection port side of the receiver), and piston on the magazine tube. Install the barrel, forearm, and magazine cap. Cycle the bolt to make sure everything moves. If it doesn’t move, it’s probably the slide link.
- Lastly, use a lightly oiled rag and wipe down your shotgun’s metal surfaces. Remember, moisture can even accumulate in fingerprints and cause corrosion.
- That’s it!
Take Care of Your SX4, And It Will Take Care of You.
The Winchester SX4 autoloader is a mechanical device. Mechanical devices do fail. However, the longevity of your SX4 and how it performs in the field is up to the person looking back at you in the mirror. These shotguns will take serious abuse, as proven time and time again. However, a mechanical device that receives no maintenance will eventually stop working to its full potential. Your job is to make sure that never happens.